
Blogging is one of the ways to express your thoughts or to tell your story, or share your experience with anything in the world. It is also one of the trending digital nomad things to do as well. Passionate bloggers who are blogging about different topics are also making a living from their work as well. A lot of people who are unfamiliar with blogging might think that this is a very technical job or extremely hard work that requires a lot of time to start or to work on. But it is really simple.
You can also start your blog in under 10 minutes and start writing about the things, events, or experiences that you want. Today, in this article, I am going to show you how easily you can set up and start your blog within 10 minutes with the help of Rambhost.com. This step-by-step guide will lead you to the very basic level, so you do not need to have that much prior experience in blogging, all you need is a laptop or computer to start your blog.
Follow these 10 steps to start your blog within 10 minutes.
The super easy way: We do it for you for FREE >>
Or follow these steps below
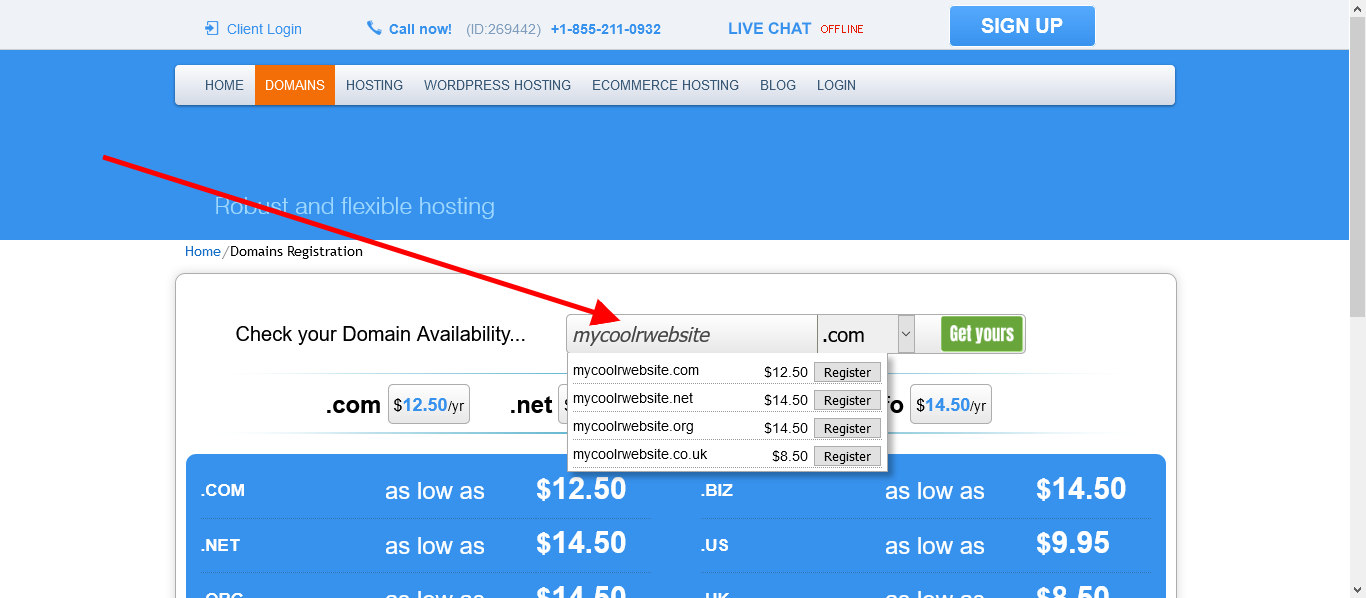
1-Get a domain name: (If you don’t have one we suggest you get the hosting below-it comes with a FREE domain)
You need to get a domain name. A domain name is the name of the website/blog. You must select a domain name that is relevant to your topic or niche that you want to blog about.
- You can get a domain here http://rambhost.com/services/domains-registration this will also suggest domain names. You can also use these services to help you come up with a catchy name:
- http://www.leandomainsearch.com – simply add a keyword and it will propose available names
- Or you can hire us to do the research for you. You will save time, and get up to ten creative names to choose from.
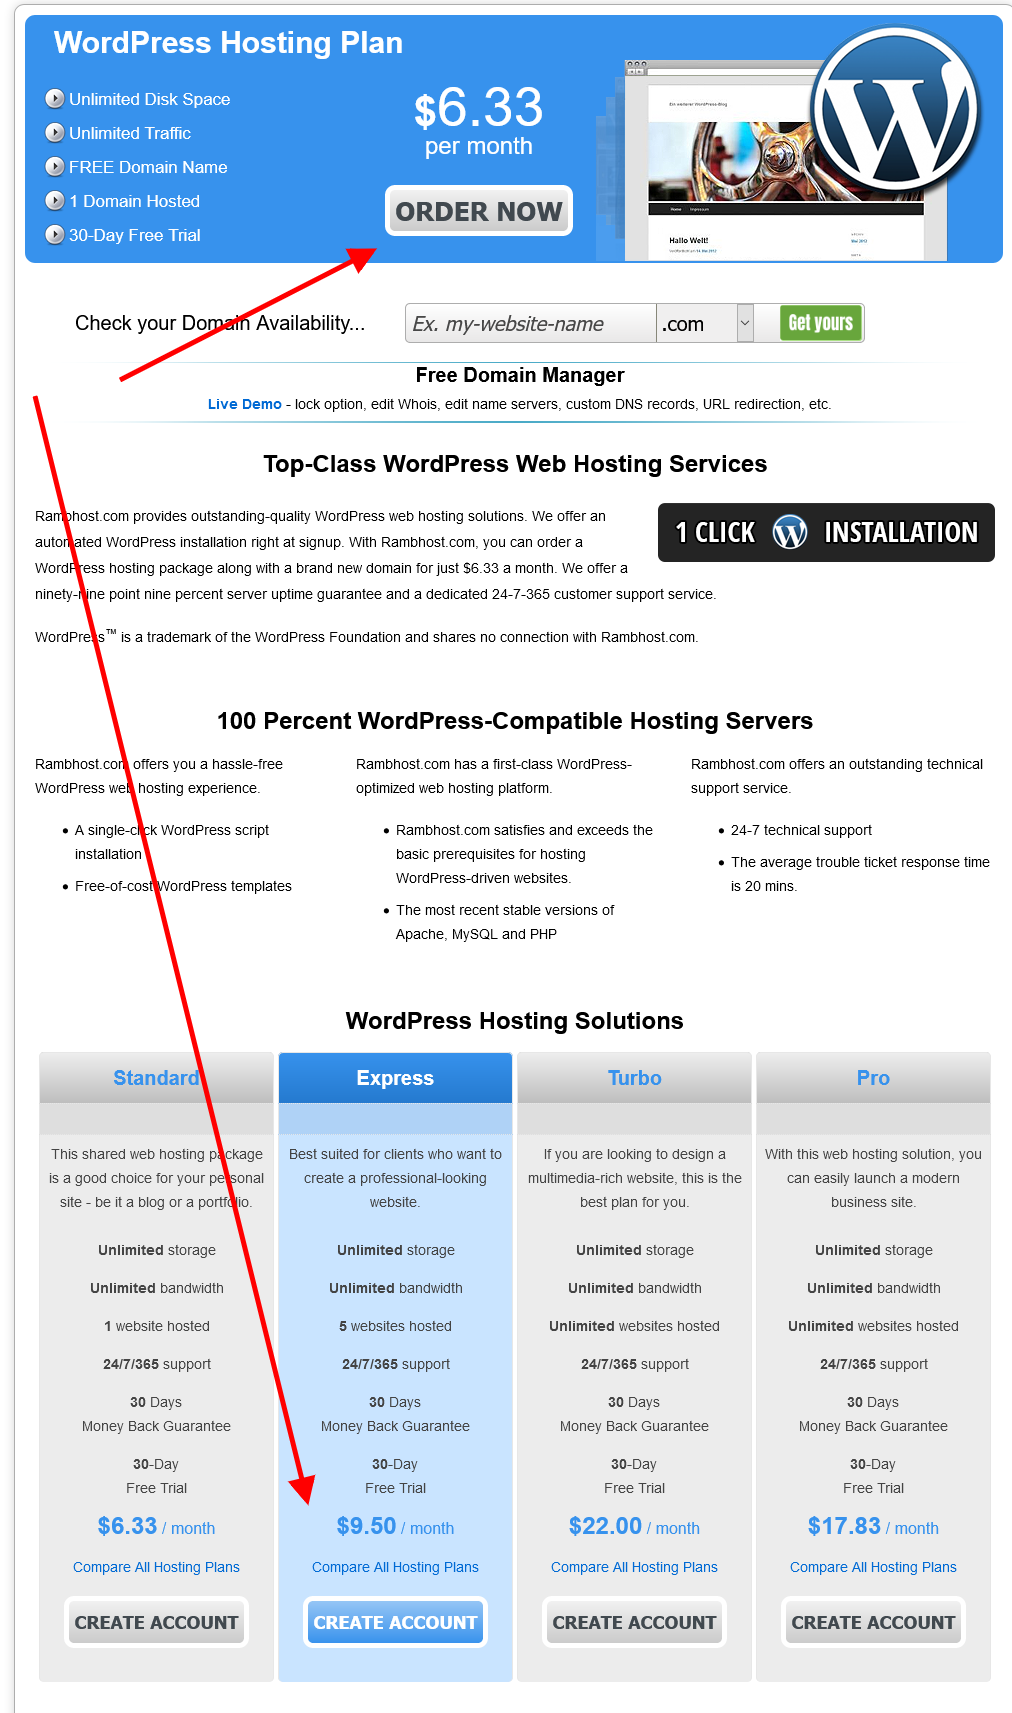
2-Get a hosting:
You need a hosting to have a website up and running. See the hosting as a store building and the domain name as the store’s address. You can purchase website hosting from Rambhost.com. They offer affordable and excellent hosting services. Rambhost provides robust services and 24 hours uptime, 30 days money back guarantee, and 24/7 customer supports. What is important for you to know is that, if you need resources to be upgraded, you will not be charge to upgrade the whole system, but instead you will be charge to only upgrade what you need. Example:
You might need more emails, or more power. You have the option to only upgrade these items instead of the whole thing. Thus you save on time, and money. Here are some benefits of Rambhost:
- 24/7 customer support – We typically answer within 5 minutes. You literally have a team making sure your hosting is on point.
- 30 days money guarantee – So you can try and see if you like it
- Fast hosting – you can add more resources at will
- Unlimited bandwidth
- Host 5 domain names free
- Get a free domain name when you get a hosting
- 99.9% uptime – This help your website stay up
- Daily backup – Things happen so we provide daily backup just in case.
- Create professional emails and more
- Check out the hosting panel demo: https://rambhost.com/services/the-hepsia-hosting-control-panel
You can order the basic one for less than $7 per month, and it will automatically install wordpress or you can also have a more robust one for less than $10/month
3-Register domain with hosting:
If you already have a domain name with another company, you can host it here. Simply go here https://rambhost.com/services/wordpress-hosting
When you put your domain name it will ask you if you want to transfer or host it here. Simply follow the steps.
If you are still confused, we can do the work for you. Simply contact us at contact@rambhost.com and We will gladly take care of it for you.
4-Install WordPress CMS: (If you choose WordPress hosting, it will automatically install WordPress so you can skip to step 5)
After registering your domain name with your hosting, you can visit the control panel of your website and install a WordPress CMS into your hosting. WordPress is a content management system that will provide you easy work with the dashboard to control everything on your website and publish your blogs. It is the most robust and widely used blogging platform on the planet! It is used even by the UN, Senate, The White House and major agencies and companies
Installing WordPress CMS is very easy.
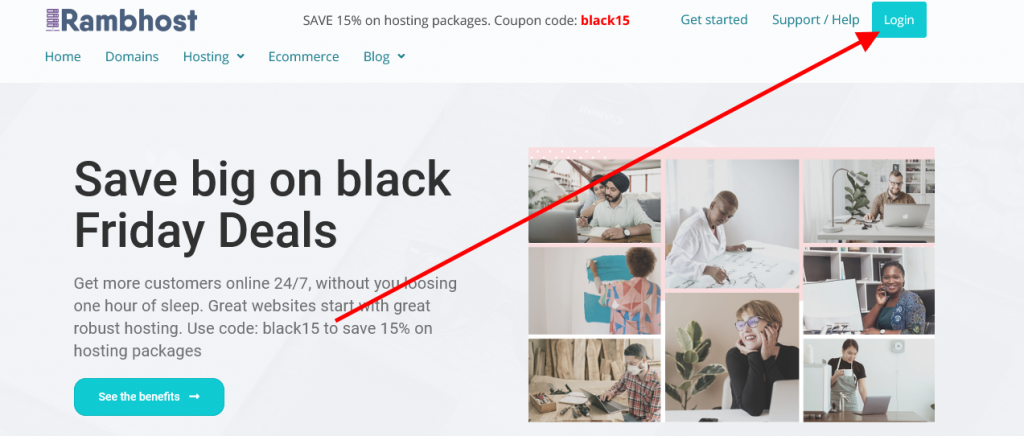
- Go to your control panel provided by your hosting provider. By login through rambhost or check the email you received.
- In the control panel go to the installer.
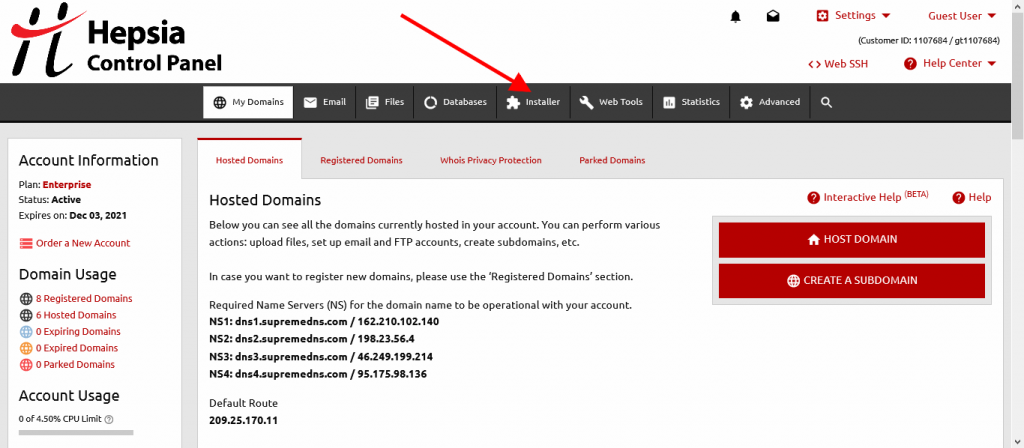
- Click on the application installer option.
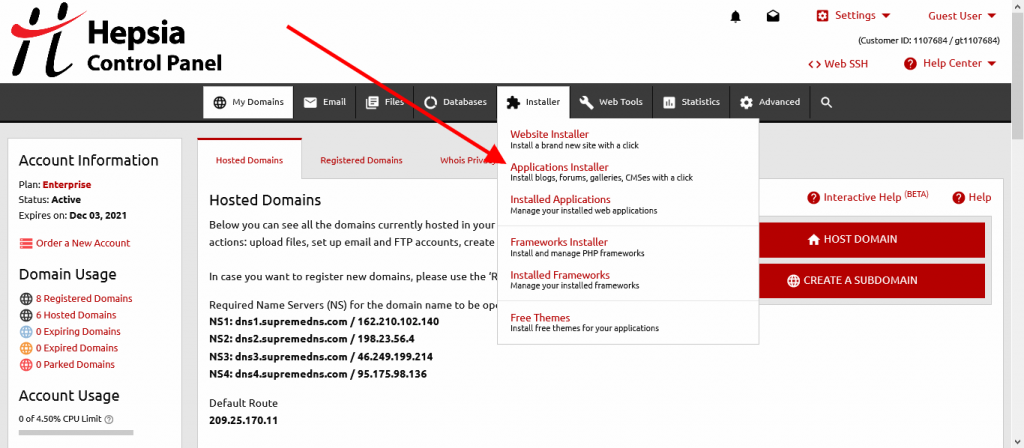
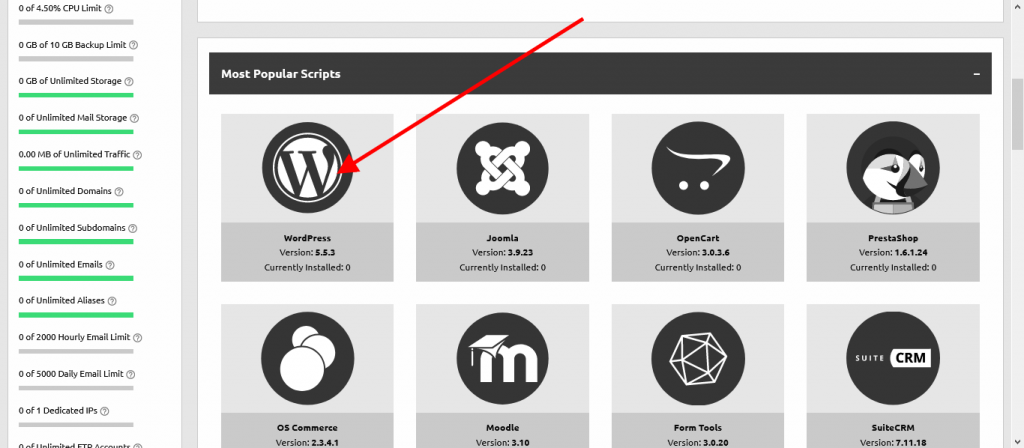
- Choose WordPress and click on install.
- It will open a pop-up window that will ask you to submit some information about the domain, user name/email, and password, etc.
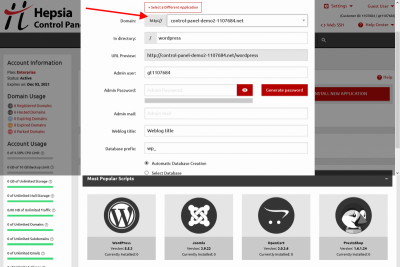
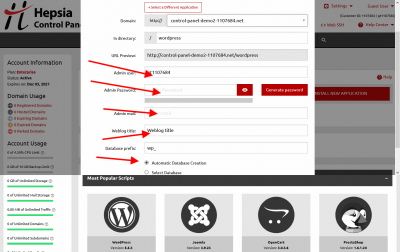
- After filling in the information, click on the install now option and it will install WordPress CMS.
This is it, WordPress installation is done.
5-Go to your domain/wp-admin (example.com/wp-admin):
Now, after the installation of WordPress CMS, you can log in to the admin dashboard by going to exampledomain.com/wp-admin. Example if your website is mycoolwebsite.com therefore your admin dashboard link will be www.mycoolwebsite.com/wpadmin
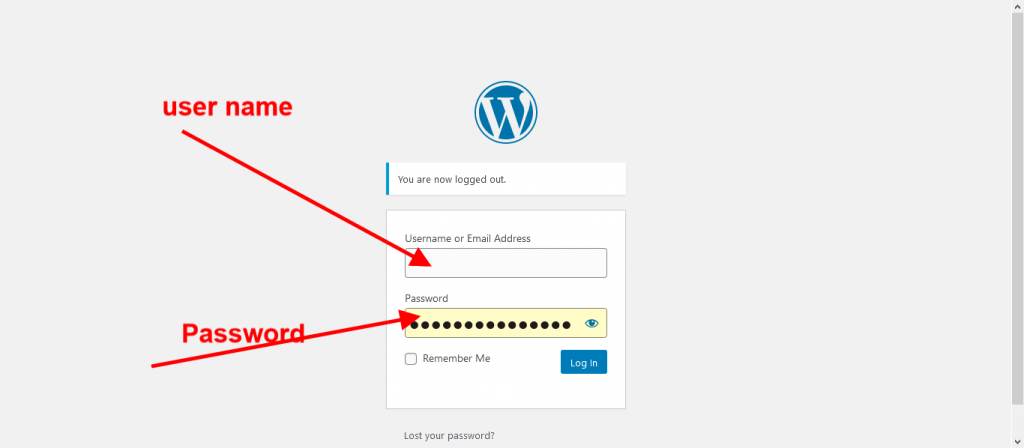
6-Login to WordPress dashboard:
Once the page opens, you need to enter your user name and password that you set in the hosting control panel while installing WordPress. After that, a dashboard will open. The WordPress dashboard is very simple and easy to navigate even for the newbies as well.
Scroll up and down to see the different options and menus that are present there, this will help you get used to the dashboard. Once you get used to this dashboard, you will be able to do things better and a lot faster. We do offer plenty of tutorial on how to use WordPress. Feel free to check them out they will be very helpful to you
7-Select and add a theme for your blog:
Now, you need to install a theme or a design for your website. You can go to your WordPress dashboard and follow these steps:
- Click on the “Appearance” button on the left sidebar of the menu buttons.
- Click on the add a theme button and select a theme that you want.
- You can also buy premium theme from Themeforest.net
After selecting the theme click the install button and the theme will be added to your blog. Always choose a simple, and relevant theme to your domain or niche. Also, keep in mind that the theme must be optimized for mobile users as well. Most of Themeforest.net theme are already optimized for mobile.
How to choose a good premium Themeforest.net theme?
- Go to Themeforest.net
- Click on wordpress link on the top menu
- Choose blog/magazine
- Filter by relevance
- Inside the theme page always make sure the theme is up to date. You want to choose one that has been recently updated, has strong rating (I suggest 4.6+), and a lot of orders (I suggest 500+)
- Most of the theme comes with documentation
You can also check out this tutorial: How to add a theme on your WordPress blog
8-Add information to your website:
Once you have installed the theme in your blog, you can start adding different kinds of information about your website. You can click on the Customize your website option and start filling out different information about your blog. Keeping it real and simple is the key here.
9-Write your first post:
Now, you have done all the required settings for your blog. This is time to add some posts. You need to click on the posts button and an editor will appear. You can write whatever you want in the editor. Make sure it is good and written properly without errors. You can also add images to your posts. Click on the gallery button and select images and add them to your post. Once you are done writing, you can publish this post.
Check out a tutorial on how to use WordPress and create your first post
10-Click Publish:
Publishing a post is very simple, after completing the writing and proofreading of your post, you can click on the publish button and your post will be live on the internet and anyone can see it and read it.
That’s all, you have successfully published your first blog post on your own blog!
BONUS: If this sound to complicated for you, the good news is it is not for us. Therefore we can set up the blog/magazine website for you FREE of charge when you get a hosting package with us. Offer is only available for the first 50 and until december 31st- 2020. Let us do it for you >>
Leave a Reply